How to Build a Deck: Expert Tips Inside
Building a deck is one of the most rewarding DIY projects you can undertake, transforming your outdoor space into a functional entertainment area. Whether you’re a seasoned builder or tackling your first major project, understanding the fundamentals of deck construction ensures safety, durability, and compliance with local building codes. This comprehensive guide walks you through every step of the process, from initial planning through the final finishing touches.
A well-built deck not only increases your home’s curb appeal but also adds significant value to your property. The key to success lies in proper planning, selecting quality materials, and following proven construction techniques. Throughout this guide, you’ll discover expert tips that professional builders use to create decks that withstand years of weather exposure and heavy use.
Planning Your Deck and Understanding Permits
Before driving a single nail, you must invest time in careful planning. Start by determining your deck’s purpose—will it serve as a dining area, lounge space, or entertainment hub? This decision influences size, layout, and structural requirements. Sketch your design on paper, noting dimensions, access points, and any existing landscape features you want to preserve or work around.
Checking local building codes and permits is absolutely essential. Most jurisdictions require deck permits if the deck is elevated more than 30 inches above ground or covers a specific square footage. The International Building Code (IBC) establishes minimum standards for deck construction, including post spacing, railing heights, and load capacity. Failing to obtain proper permits can result in fines, difficulty selling your home, or mandatory removal of your deck.
Contact your local building department to understand specific requirements. They’ll inform you about frost line depths (critical for post placement), snow load considerations, and whether you need professional engineering plans. Many jurisdictions offer free consultations to help homeowners understand requirements before starting construction.
Materials and Tools You’ll Need
Selecting quality materials directly impacts your deck’s longevity and performance. Pressure-treated lumber remains the most economical choice, offering excellent rot and insect resistance. For premium aesthetics and durability, consider composite decking materials, which resist fading, staining, and require minimal maintenance. Cedar and redwood provide natural beauty but demand regular staining and sealing.
Essential materials include:
- Posts: 4×4 or 6×6 pressure-treated lumber, set below frost line depth
- Beams: 2×8, 2×10, or 2×12 depending on span and load
- Joists: 2×6, 2×8, or 2×10 spaced 12 or 16 inches on center
- Decking boards: 2×6 or 2×8 pressure-treated, composite, or premium wood
- Fasteners: Stainless steel or coated screws and bolts (never use nails—they work loose)
- Flashing: Metal flashing where deck attaches to house
- Concrete: For setting posts in holes
Your tool collection should include a circular saw or miter saw, power drill, level, tape measure, carpenter’s square, and safety equipment. For larger projects, consider renting a power auger for digging post holes and a wet saw for composite materials. Proper tools make the work safer and more precise, preventing costly mistakes.
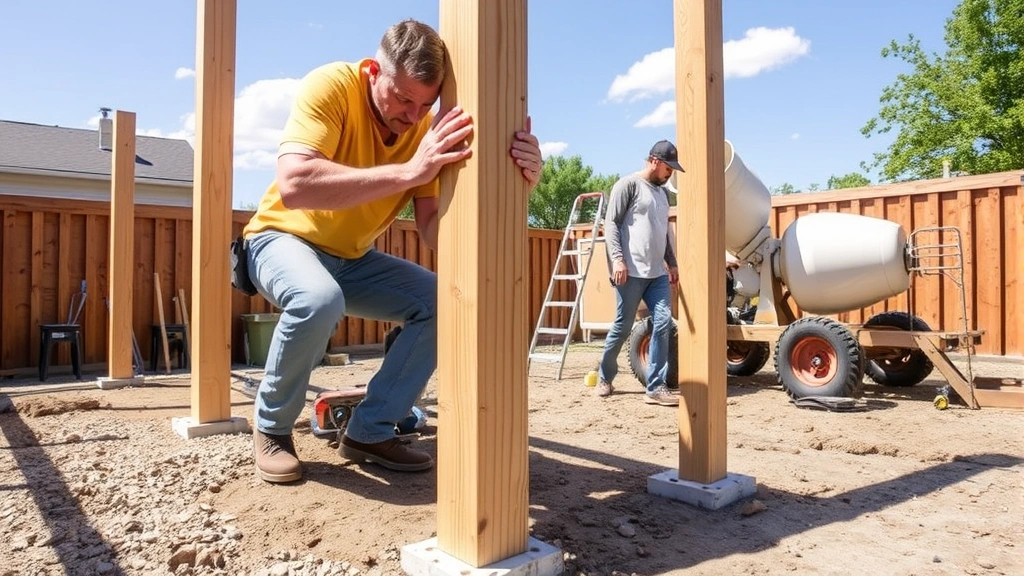
Building a Solid Foundation with Posts
The foundation is where deck durability begins. Posts must extend below the frost line—typically 36-48 inches deep depending on your climate zone. Frost heave, caused by freezing and thawing soil, can lift improperly set posts, creating dangerous structural movement and deck failure.
Start by marking post locations using string lines and a tape measure. Spacing depends on beam size and load requirements, but typically posts are spaced 8 feet apart for standard residential decks. Use a power auger to dig holes, ensuring they’re square and plumb. Place 4-6 inches of gravel at the bottom for drainage—this prevents water accumulation and rot.
Set posts using concrete, which provides superior stability compared to tamped soil. Mix concrete according to manufacturer instructions and pour it into holes around the posts. Use a level to ensure posts are perfectly vertical in both directions. Allow concrete to cure fully (typically 24-48 hours) before proceeding with beam installation. This critical step determines whether your entire deck structure remains stable and safe for years to come.
Framing Your Deck Structure
Once posts are set, install beams on top using galvanized bolts and hardware. Beams span between posts and support joists. For a deck attached to your house, connect the ledger board securely using galvanized bolts spaced 16 inches apart through the house’s rim joist. This connection must be absolutely solid—improper ledger attachment causes catastrophic deck failures and injuries.
Install joists perpendicular to beams, spacing them 12 or 16 inches on center depending on decking board thickness and material. Use joist hangers for secure, code-compliant connections. These metal brackets distribute weight properly and prevent wood splitting. Ensure all joists are level and properly supported—sagging joists create unsafe, uncomfortable decks that look unprofessional.
Add blocking (cross-bracing) between joists every 4 feet to prevent twisting and improve structural rigidity. For larger decks, diagonal bracing under the deck provides additional lateral support and prevents excessive movement during use. This framing stage determines your deck’s structural integrity, so take time to verify all connections are tight and properly fastened.
If you’re interested in learning more about structural building techniques, our guide on basement finishing includes detailed framing information applicable to outdoor structures.
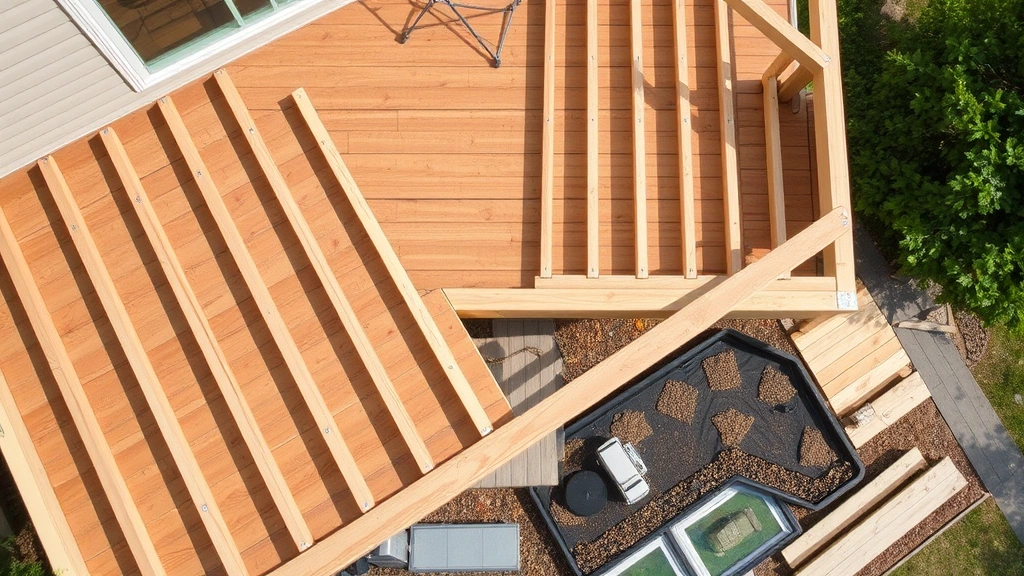
Installing Decking Boards
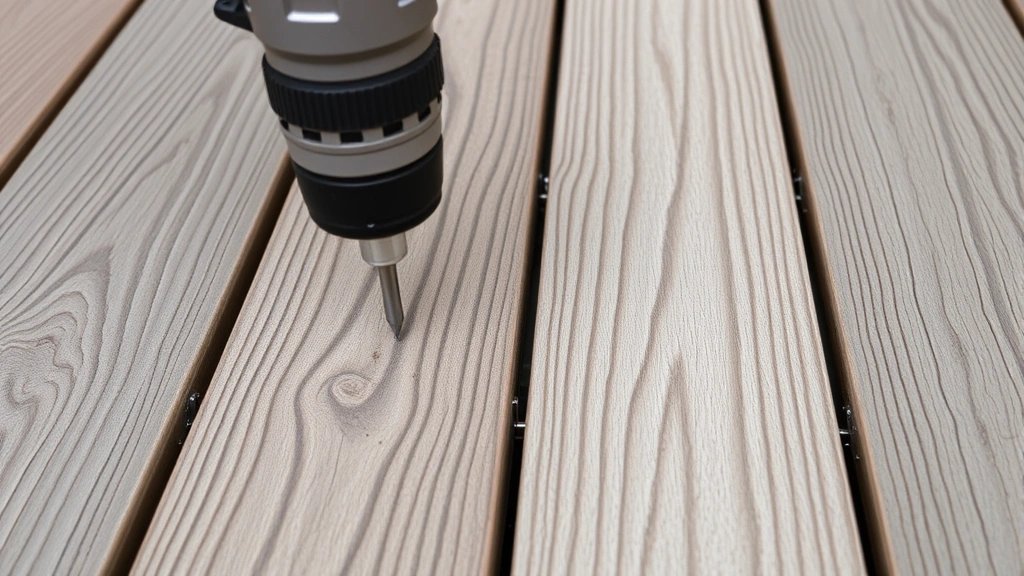
Decking board installation is where your deck truly comes together visually. Begin at the house attachment point if building a deck attached to your home, or at one end for freestanding decks. Leave a 1/8-inch gap between boards for expansion and contraction with temperature and humidity changes. This gap is crucial—failing to account for wood movement causes boards to buckle and warp.
Use corrosion-resistant screws (never nails) to fasten boards, typically two screws per joist per board. Stagger your screw placement to avoid splitting boards and to distribute fastening pressure evenly. Pre-drill screw holes to prevent splitting, particularly near board edges. For composite decking, follow manufacturer specifications carefully—some materials require specific fastening methods and spacing.
Maintain consistent spacing throughout installation for a professional appearance. Use a spacer block to ensure uniformity. Cut boards around posts and obstacles using a circular saw with a carbide blade for clean cuts. For boards requiring cuts at angles, use a miter saw for precision. The decking installation stage takes significant time but yields the most visible results.
Adding Railings and Safety Features
Railings are legally required for decks elevated more than 30 inches and serve critical safety functions. Building codes mandate railings be at least 36 inches high (measured from the deck surface) with vertical balusters spaced no more than 4 inches apart. This spacing prevents children from getting stuck between balusters—a serious safety concern.
Install railing posts every 4-6 feet along deck edges, securing them firmly to the deck structure. Attach horizontal rails and balusters according to code requirements. Many jurisdictions require railings to resist 200 pounds of horizontal force without deflecting excessively. Test your railings by applying firm pressure—they should feel solid and immovable.
Stairs require handrails on at least one side if they have more than three steps. Step heights must be uniform (typically 7-7.75 inches) and tread depths consistent (typically 10 inches minimum). Use stringers (the angled supports) to create safe, stable stairs. Proper stair construction prevents trips and falls—two of the most common deck-related injuries.
Consider adding safety features like deck lighting for nighttime visibility and non-slip surfaces on stairs. These enhancements improve usability and prevent accidents. Our home security guide includes outdoor lighting recommendations that complement deck design.
Finishing and Maintenance
Once construction is complete, finishing protects your deck and enhances its appearance. Pressure-treated lumber should cure for 3-6 months before staining or sealing—applying finishes too early traps moisture and causes problems. For composite decking, follow manufacturer recommendations regarding finishing products.
Apply quality deck stain and sealer to protect wood from UV damage, moisture, and weathering. Use products specifically formulated for decks, not house paint. Apply finishes according to product instructions, typically every 2-3 years for optimal protection. Proper finishing extends deck life significantly and maintains appearance.
Establish a maintenance routine to keep your deck safe and attractive. Regularly sweep away debris, especially leaves and standing water. Clean mold and mildew with appropriate deck cleaning products. Inspect fasteners annually and tighten any that have worked loose. Check for rotting wood, particularly around posts and where decking meets the house. Early detection of problems prevents costly repairs.
For additional finishing techniques, explore our house painting guide for exterior finishing methods and our flooring installation guide for surface preparation.
FAQ
How long does it take to build a deck?
Timeline varies based on deck size, complexity, and weather conditions. A typical 12×16-foot deck takes 3-5 weekends for experienced DIYers. Larger or more complex decks may require several weeks. Add time for permit approval and concrete curing. Professional builders typically complete similar projects in 1-2 weeks.
What’s the most common cause of deck failure?
Improper ledger board attachment to the house causes most catastrophic deck failures. The ledger must be bolted through the rim joist with properly spaced fasteners and flashing to prevent water infiltration. Never use nails alone for ledger attachment—they work loose under stress.
Can I build a deck without a permit?
Building permits exist to ensure safety and structural integrity. Unpermitted decks can result in fines, forced removal, and liability issues if someone is injured. When selling your home, undisclosed unpermitted work creates legal and financial problems. Always obtain proper permits before starting.
What’s the best decking material for durability?
Composite decking offers the best durability-to-maintenance ratio, lasting 25-30 years with minimal upkeep. Pressure-treated lumber costs less initially but requires regular maintenance. Cedar and redwood offer natural beauty but demand more frequent sealing. Choose based on budget, desired appearance, and maintenance tolerance.
How deep should deck posts be set?
Posts must extend below your area’s frost line depth. Contact your local building department for the specific requirement—typically 36-48 inches in cold climates, less in warmer regions. Frost heave from freezing and thawing causes posts set too shallow to shift dangerously.
Do I need a railing for my deck?
Yes, if your deck is elevated more than 30 inches above ground. Railings must be at least 36 inches high with balusters spaced no more than 4 inches apart. These requirements apply regardless of whether you have children—they’re safety standards that protect all users.
How often should I seal my deck?
Pressure-treated decks need sealing every 2-3 years after the initial 3-6 month curing period. Composite decks typically require no sealing. Cedar and redwood benefit from annual sealing for optimal protection. Check your deck’s surface—if water no longer beads on the wood, it’s time to reseal.
Can I attach a deck to my house myself?
Yes, but the ledger board connection is critical and must be done correctly. Use galvanized bolts spaced 16 inches apart through the rim joist, add flashing to prevent water damage, and ensure the house foundation can support the additional load. Improper attachment creates dangerous failure risks.
Additional Resources:
- American Wood Council provides lumber specifications and design guidance
- National Fire Protection Association offers outdoor safety standards
- National Association of Home Builders provides construction best practices
- DIY Nests Hub Blog for additional home improvement projects
For woodworking skill development, review our beginner woodworking projects guide to build confidence with tools and techniques applicable to deck building.


